Total Entries: 32

Banana Cheesecake
So I have been wanting to make banana cake for a while but I wanted something sweeter this time. I decided on cheesecake also because I haven't made cheesecake on my own. The water bath always kept me away from making it. Silly, I know! I used a pretty small cake pan so it was easy to fill up the outer pan with water without having it overfill. The cheesecake turned out pretty good. I didn't know banana extract was a thing, but that is what gave it such a strong banana flavor. I could have made banana bread, but I don't really like bread a whole lot like that. It's good for the first bite, but I easily get tired of it. For the cheesecake crust I used Nilla Wafers, I had to since it goes well with bananas. I messed up on the crust because I over baked it in the beginning. After taking the crust out of the oven, it still felt a tiny bit soft. It wasn't super soft and I haven't ate cheesecake in a while so I don't remember how hard the crust should be. Anyways, I poured in my batter and baked my cheesecake, and there was no cracks! It looked super spongey like spongebob and tasted great. The crust was a bit hard to break but it actually turned out really good. I made some banana whipped cream to top it off and it was perfect. Not too sweet and super light. The minion movie was also coming out next week! So this banana dessert was perfect for that occassion. The movie was 10/10, I loved it. James is so adorable and I loved goomi and his character design. I'll give this recipe 5/5 cactuses. Everything was pretty easy to follow and my cake turned out just how I imagined it. The banana flavor was really there and the consistency was good.
6/20/2026
5
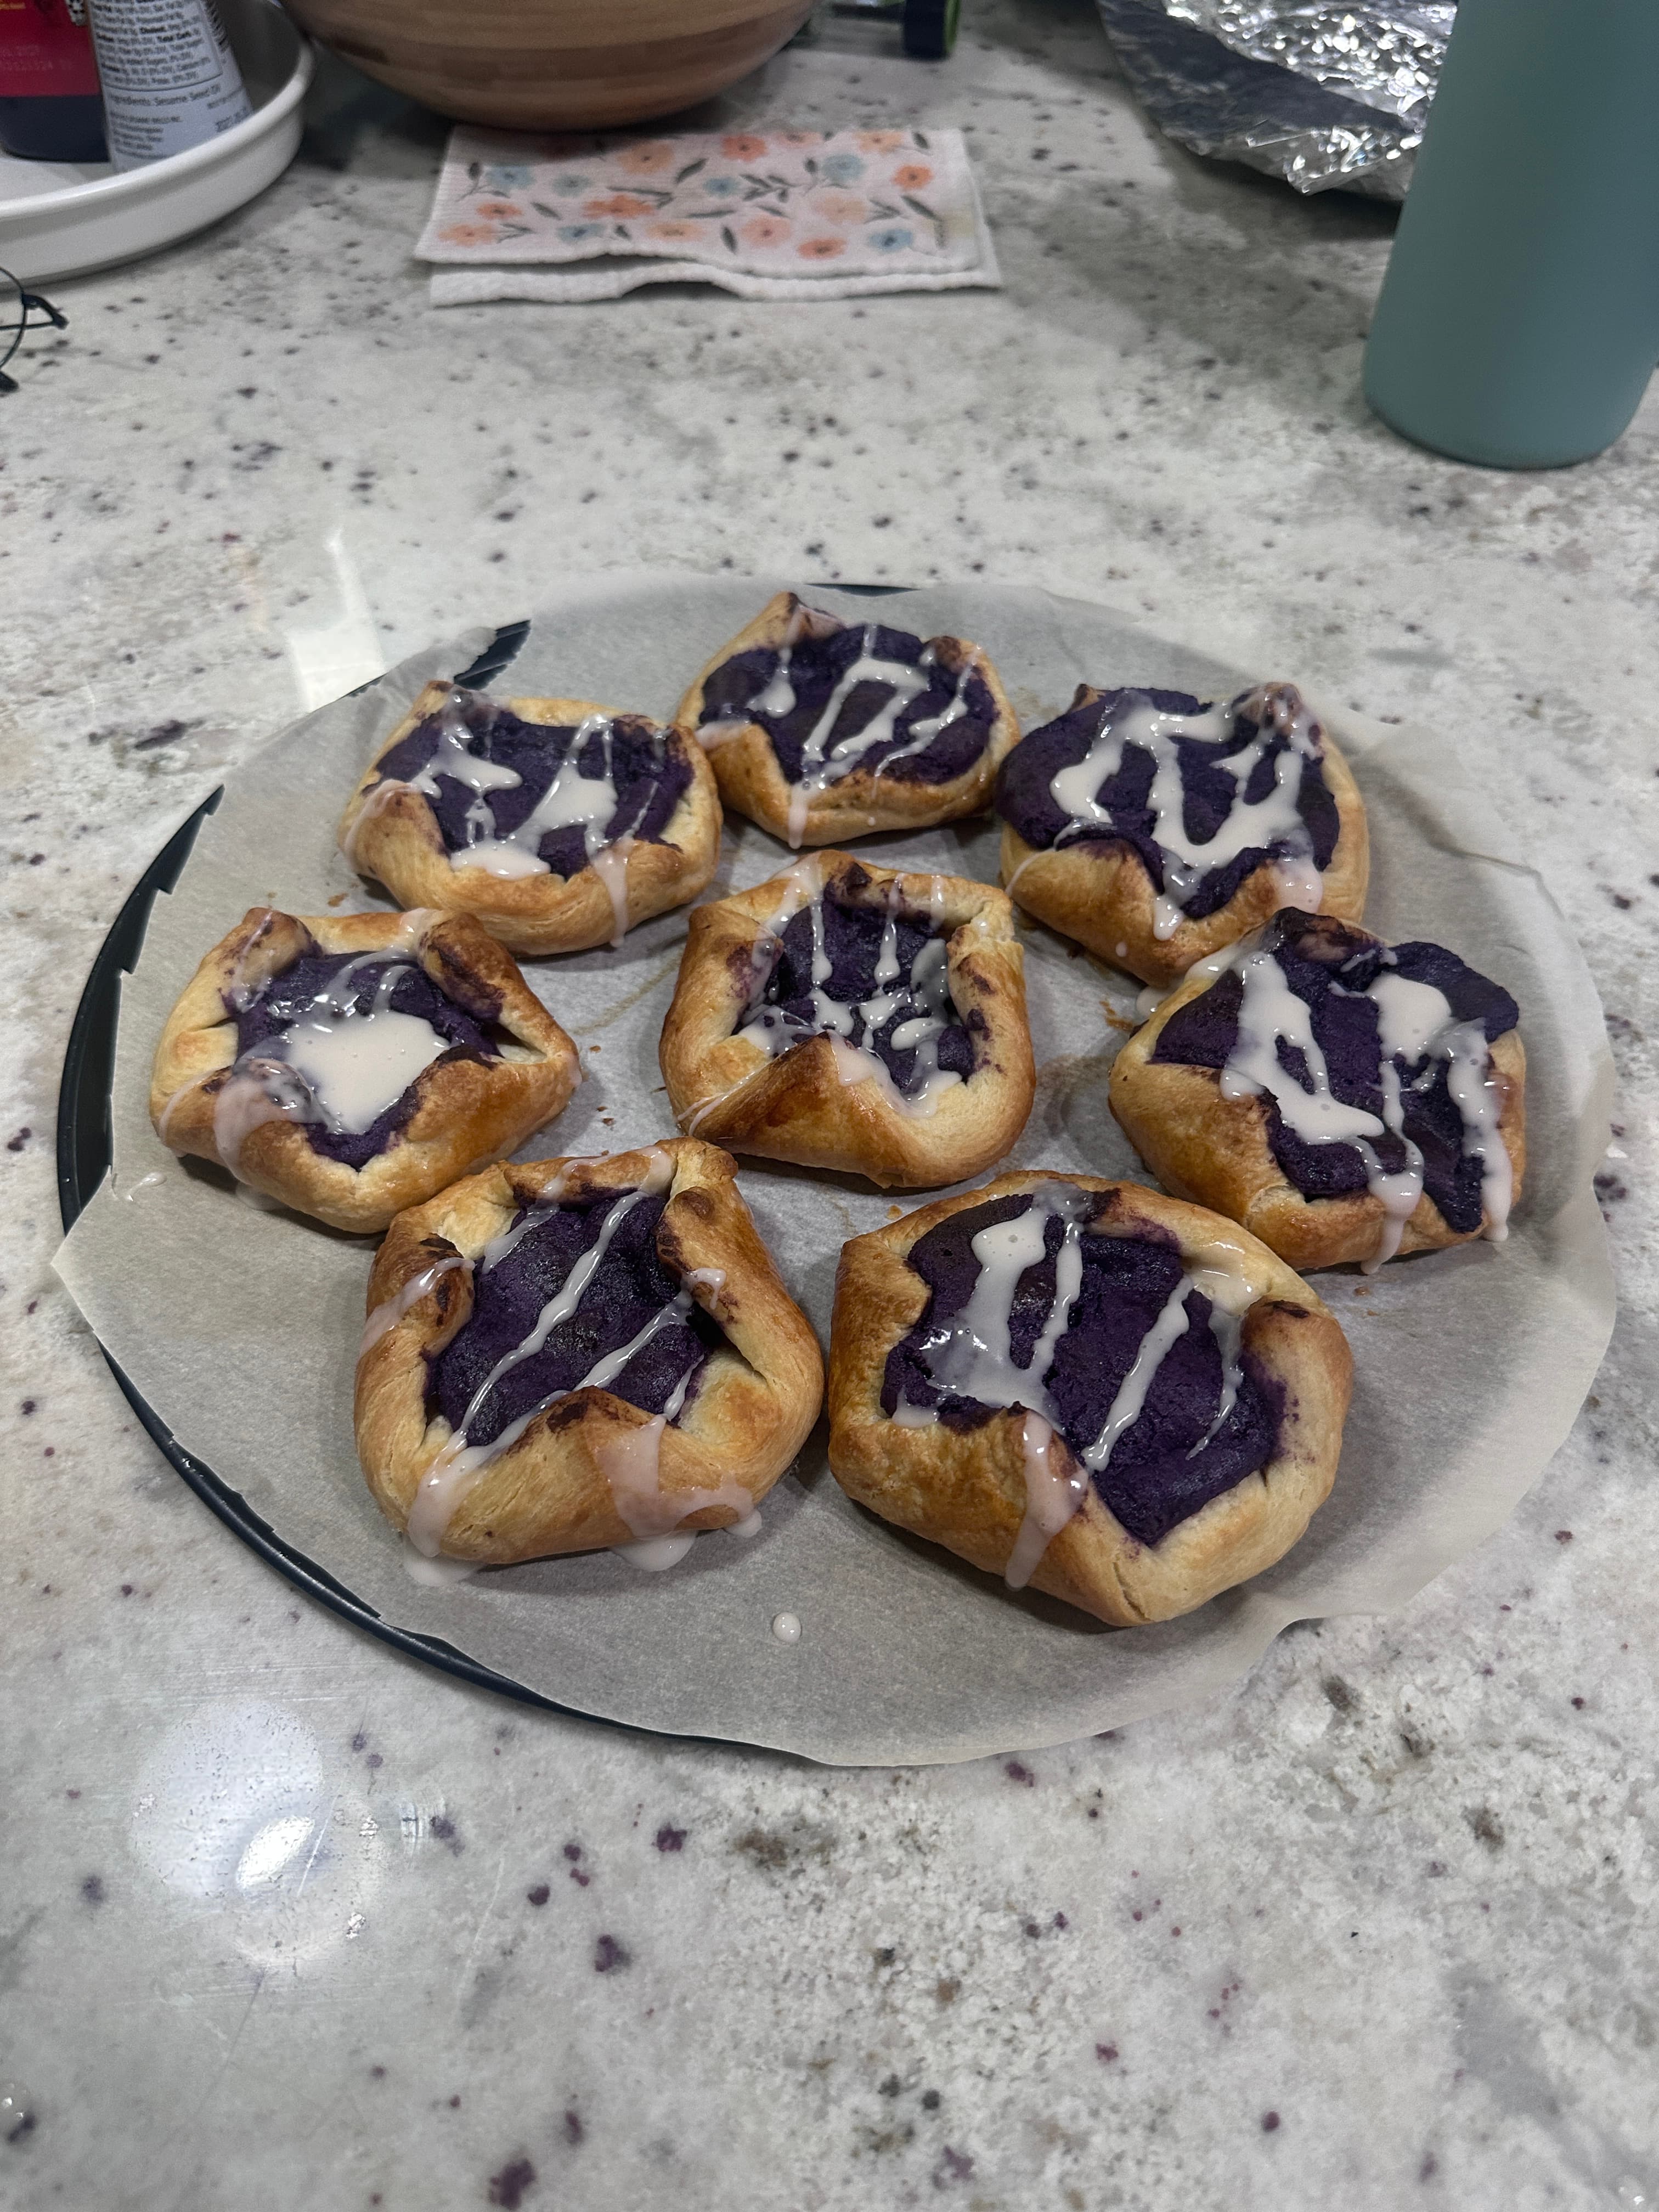
Ube pt 6: Danishes!
I was craving ube this time so I decided to make danishes! This is actually the same recipe I used the first time I made a puff pastry. It turned out kind of good this time, because I didn't roll out the pastry enough so the danishes looked super big and thick. It taste much better warm since the pastry isn't as hard and it gets flaky. This was much better than my previous rough puff pastry dough since it was actually flaky. The bottom was a bit undercooked since I might have taken it out early. I was scared that it was going to burn because the egdes started turning dark so fast. The regular recipe is actually just normal danishes. For the ube filling I used cream cheese, a little sugar, ube jam, and extract. It was thick enough for the filling not to splll out of the dough which was good enough for me. The filling is super thick and had an amazing color, thanks to the extract as always. You can make anything ube as long as you have extract + jam. it is just so easy. The glaze turned out pretty good too. I didn't make the glaze before as I thought the pastry was sweet enough, but I never had a successful glaze yet, so I wanted to try it this time. It harden and gave it a lot of extra sweetness. I think my sweetness meter is too high, so I need to tone it down a bit. I give this recipe 5 cactuses, as this is my second time following the recipe. I am hoping to get better with my dough making skills as that is one thing I really want to get good at by the end of the year. I love ube, and I can't wait to make more ube desserts this year lol.
6/9/2026
4
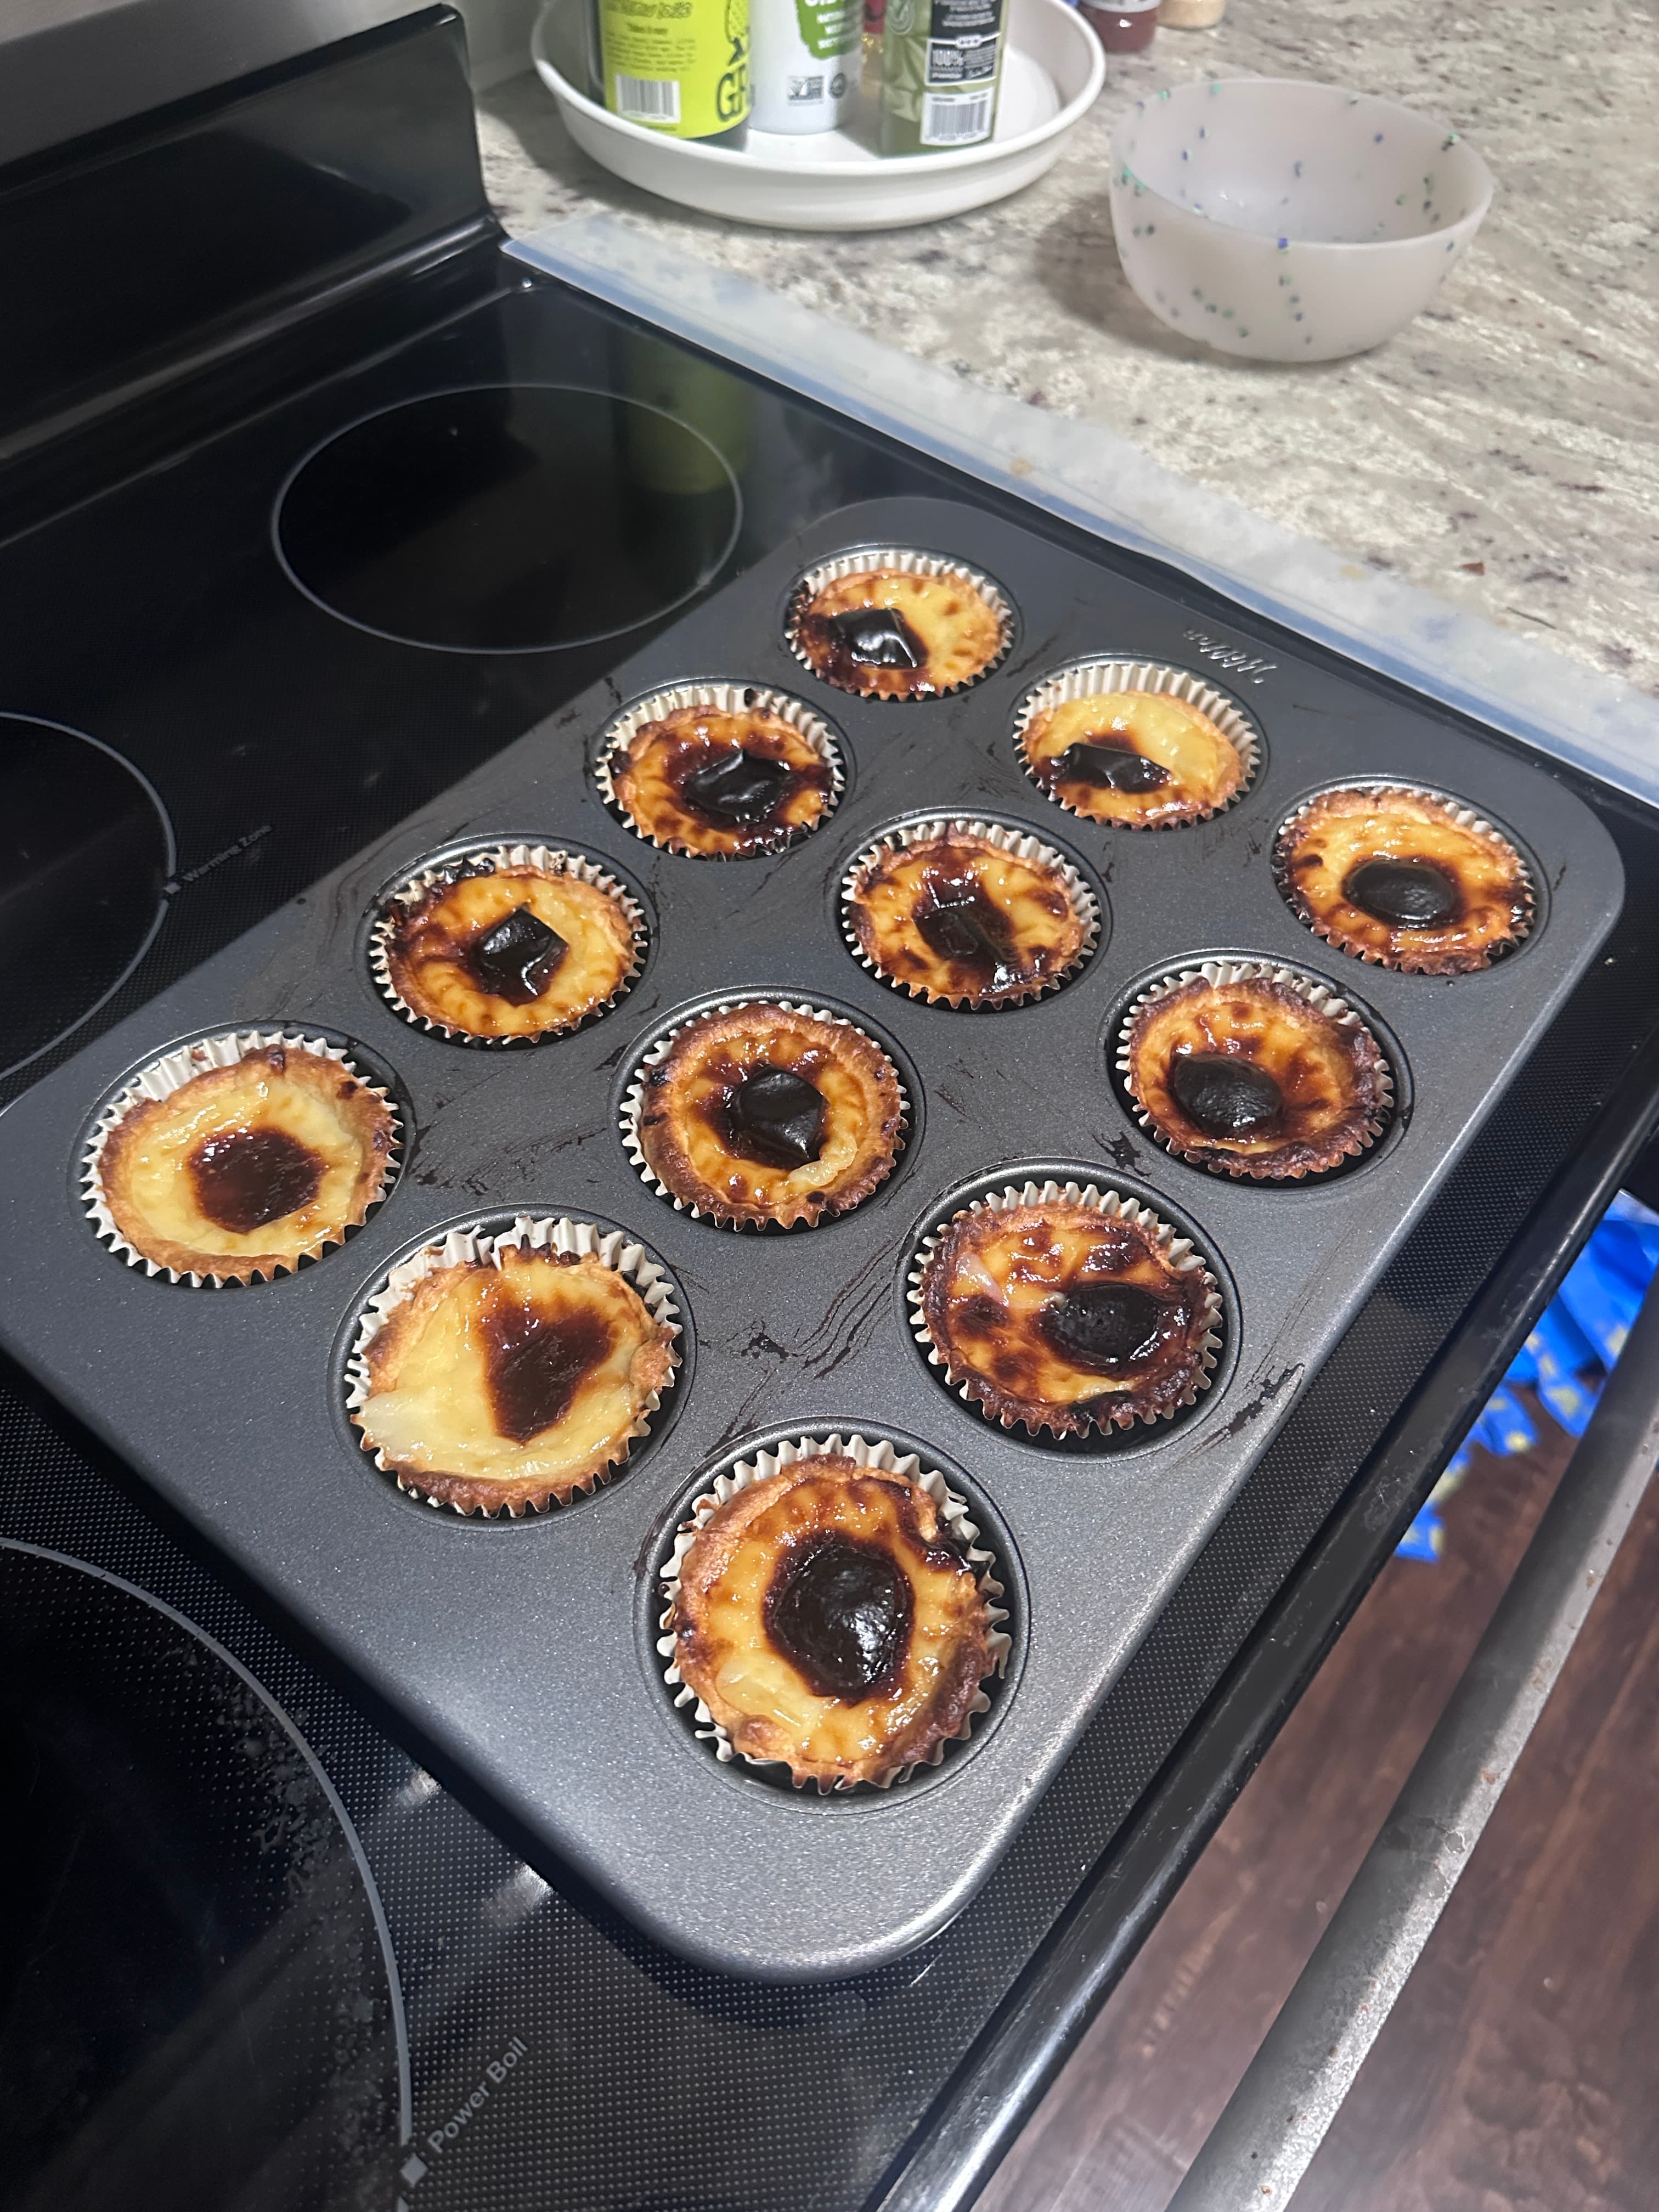
Macau Egg Tarts
I thought I messed up really bad on this recipe. I didn’t freeze my butter. When I was making the dough, the butter was molding in with the flour. Then I added extra water and my dough got really wet. At the end, my puff pastry wasn’t as flaky as I wanted it to be. It was just a rough shell that had no crumbs. I wasn’t really surprised because when my dough came together after folding it, it was so yellow and got pretty hard since it sucked up the moisture. It did start to soften after I left it to sit out a bit and molded the cups so it wasn’t a total disaster. The pudding wasn’t to bad. The texture on top was really pretty and turned out how I wanted. I think I overfilled the cups too much because the inside was kind of gooey. I didn’t want to keep baking it because the top was already looking more burnt than getting a nice char. So putting less filling is the way to go. The consistency wasn’t super solid like I wanted it to be. The sweetness was just right though, I don’t think it was overly sweet. The mic was pretty easy to make since you mix everything and then just heat it up in a pot and keep stirring till it cools down. I am not sure why I didn’t freeze the butter. I made rough puff pastry before when making my cheese danishes. This was a fun bake since I had no idea how it was going turn out. I made some for my family and they seemed to really like it. I give this bake 4 cactuses. There wasn’t anything wrong with the recipe since it was all on my end. The crust wasn’t flaky at all and the inside could be much better. It was a learning process and I can’t wait for the next bake.
6/1/2026
5
Strawberry Loaf Cake
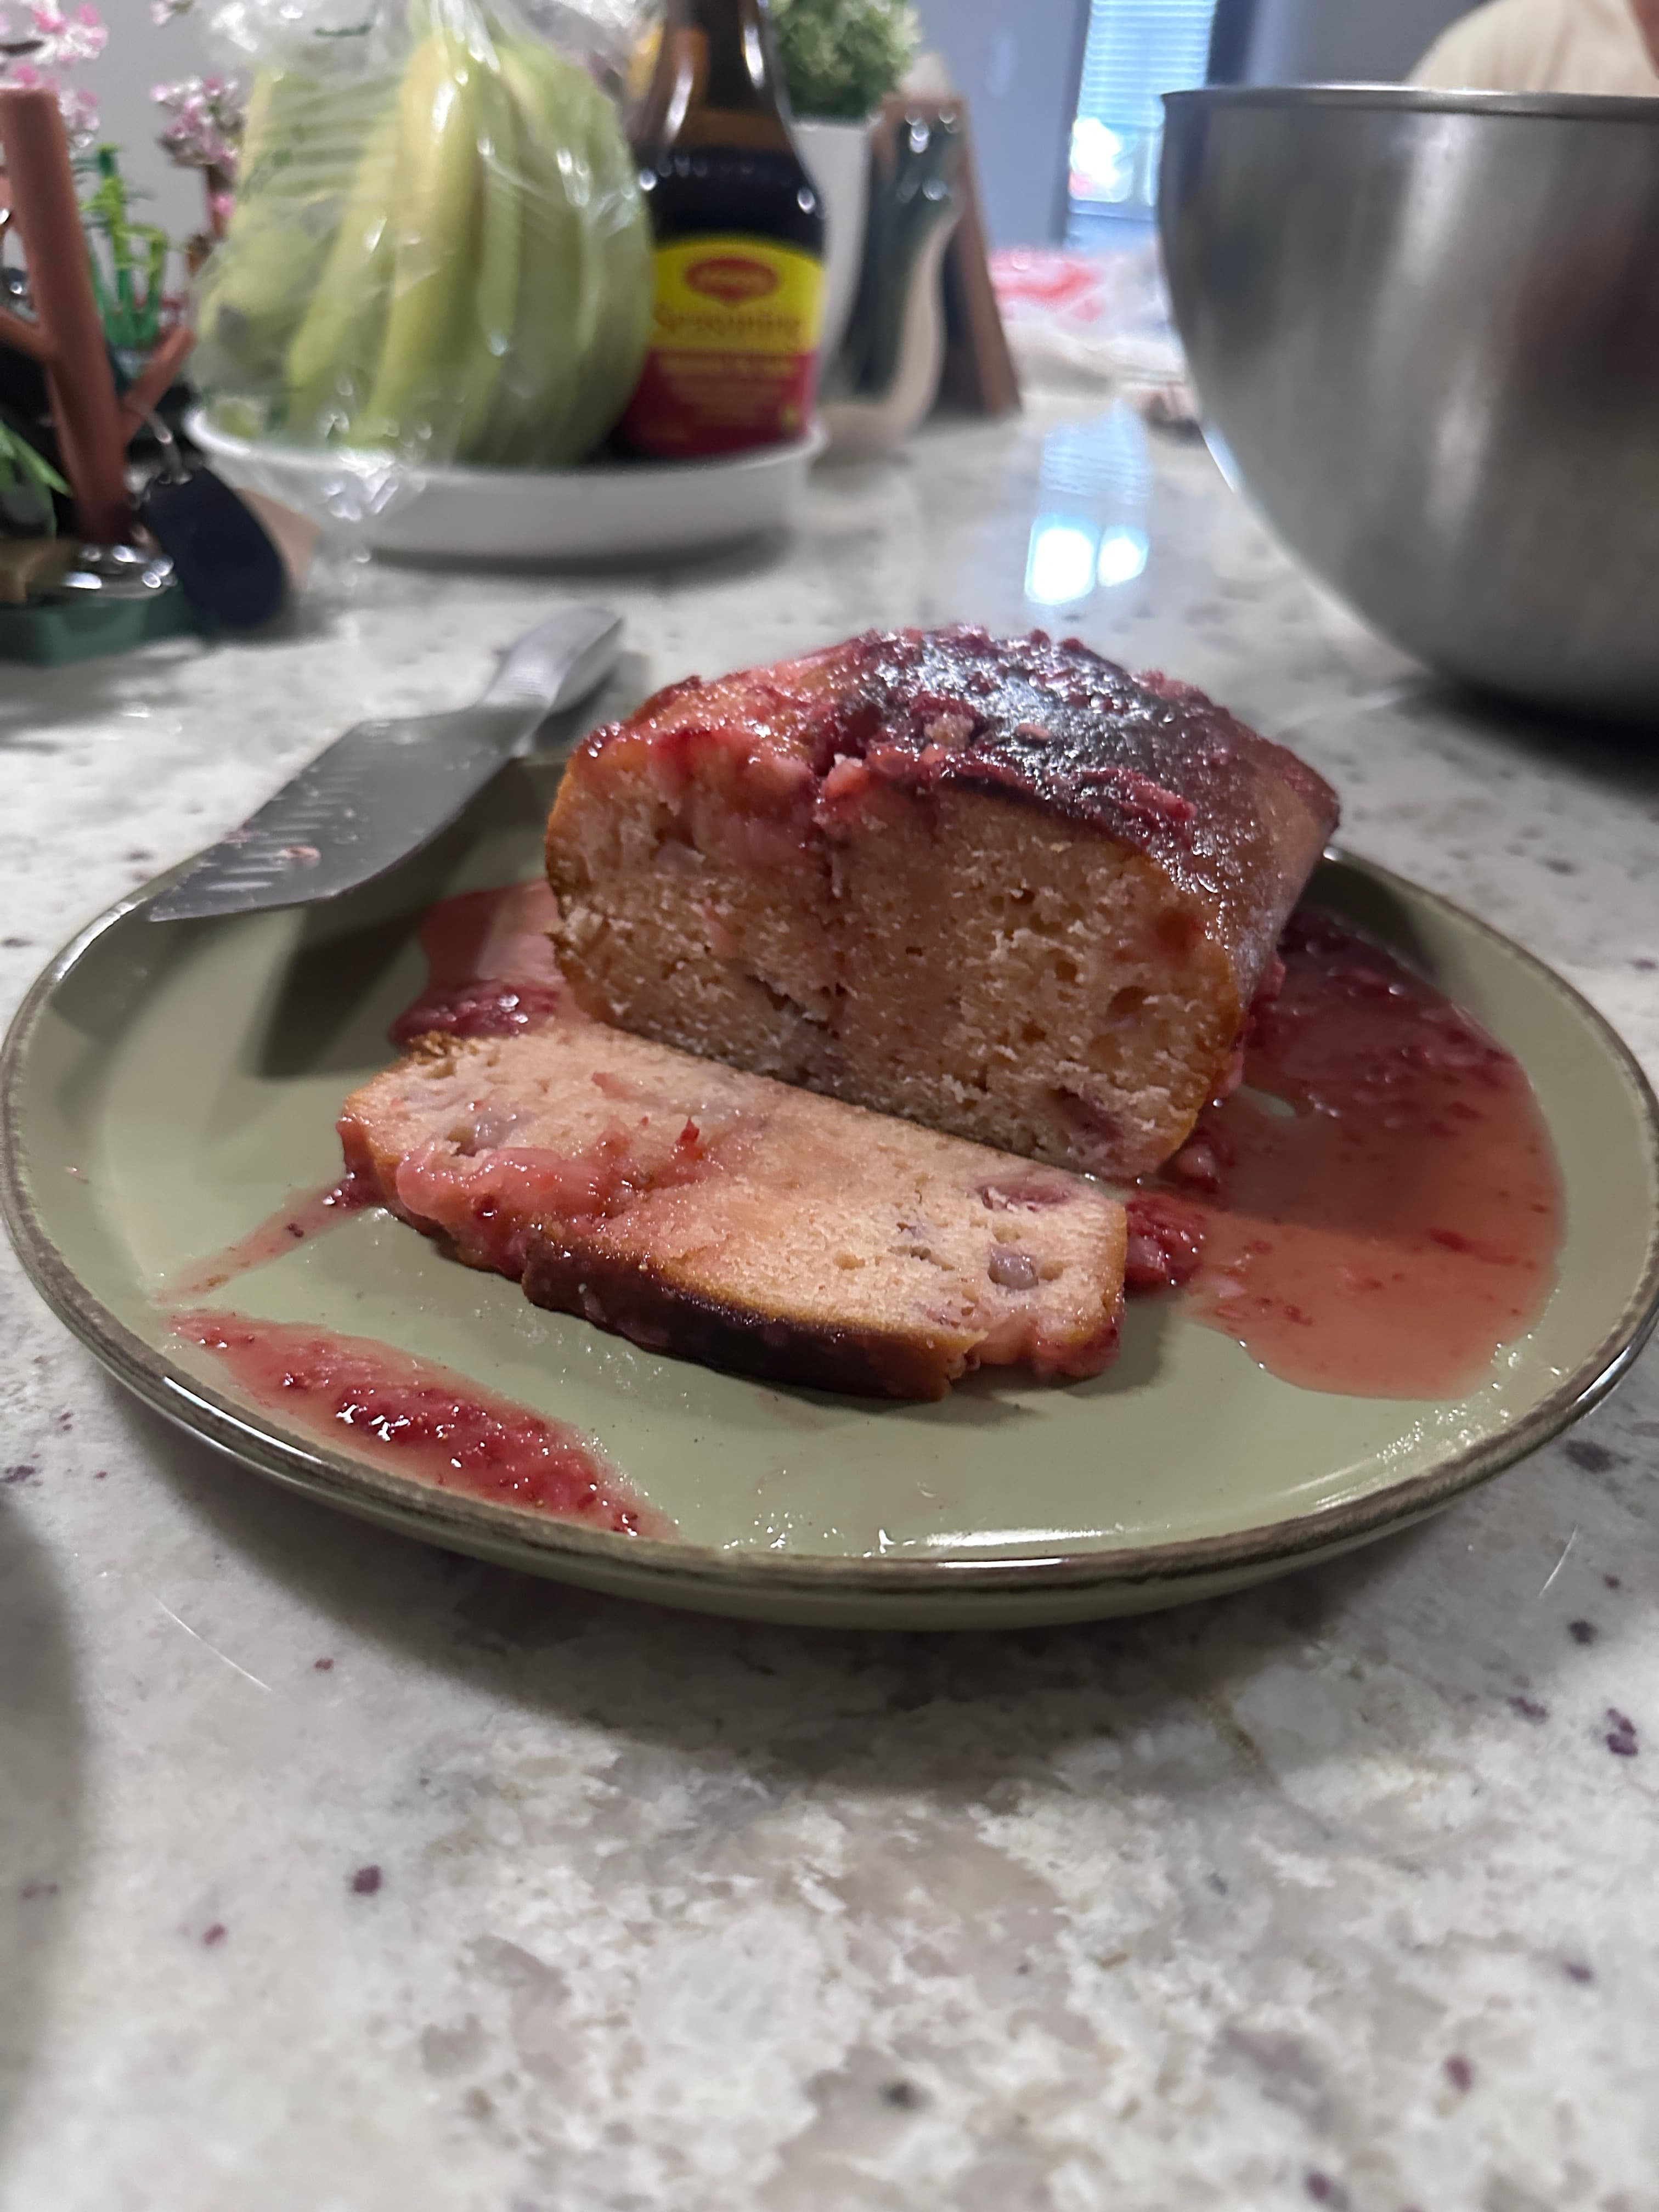
This is currently my worst bake of this year. I think the main thing that went wrong is the uneven cooking. The middle TOOK forever to cook while the ends and sides cooked pretty fast. This resulted in the loaf getting. hard crust and ruining the color). It was a nice pink until it turned into a nasty burnt brown. I saw the comments on the recipe of people saying they had to bake it for an extra 30 minutes to an hour which seemed way too long. I looked online to see what I could have done to prevent this from happening and people say to cover the pan with tinfoil as soon as you notice uneven cooking because the tin will help distribute the heat. This will help the middle of the loaf cook even along with the sides. The loaf was still edible after a few days in the fridge so it wasn't too bad. I am not sure why the bread tasted super tart either. I didn't really like it that much. If I did bake this again, then I would try the foil technique to see if that actually helps with even heating. I am not sure what else I would change because it tasted good besides the tartness. Another thing that did not go so well was the glaze. I don't think I mashed up the berries as much, but it didn't look smooth like the picture. I use powdered sugar and smashed strawberries and it still looked super chunky. I am not sure if fruity glazes are usually like this, but I was expecting it to harden and have that white coating. Overall, i'll give this recipe 3 cactuses. I thought it was good but not amazing. It's probably not the recipe's fault that the middle of my loaf didn't cook enough but I wish they provided some tips or their experience with cooking the loaf. I mean I saw ALOT of people commenting how much extra time they had to cook their loaf for.
5/20/2026
3

Nikita's Birthday!: Matcha Strawberry Cake
My first time making a layer cake turned out so cute! I didn't even want to give it away cause it looked so pretty. I made some mistakes here and I can't wait to do better next time because I learned a lot from this bake. So first, I forgot to buy ceremonial matcha so I had to use my culinary grade, and the cake turned out so dark, but the matcha flavor was definitely still there. Nikita didn't mind, but I want to bake him a better one when I get the chance. I also forgot to sift the matcha. That is super important because you can definitely see the dark green clumps in the cake. I always forget. Second, is leaving out my butter. I ALWAYS forget to do this because I just forget. I did microwave it but, I think the buttercream would have mixed better with the sugar if i left the butter out for room temperature rather than microwaving it. Nikita didn't like the frosting as much because it was so sweet. He said: "like the flavor, but you really need to chill on the sugar lol." That made me giggle, because I DID put less sugar lmao. Anyways, I just think it needed to mix better. That was my first time making buttercream and it was much thicker and like a paste more than I thought it would be. I kept adding more heavy cream hoping it would get more water and it did work a bit and made it less sweet, which is what we wanted. I think another problem is that I used regular sugar instead of powdered sugar. According to the internet, powder sugar is more thin and smaller so it mixes and melts much better for frosting and glazes. I'll definitely note this for my next bake that includes buttercream. One interesting thing to note is that, if your buttercream is yellow, just keep mixing and it will turn more white. I don't know why this happens, maybe because the butter will just lose its color and keep mixing? Someone on the internet said to do this and it worked! I mixed it for like 10 minutes, but it did turn less yellow. This was my first time making LAYERS and it was so fun. I also bought a small piping kit with multiple tips from daiso to make the little frosting flowers and it was really fun! Now this is why I bake, to test and try out new things. I can't wait to bake something new and experiment again. From the cake bits that I tried out, I would give this recipe 5 cactuses. It was super easy to follow and my cake was still pretty good even though I didn't use ceremonial matcha and powdered sugar. The strawberry and piping decorations turned out super cute, along with the matcha powder on top. I'd say this was a mostly a successful bake. i hope Nikita would want to try another one of my bakes again!
5/11/2026
5

Ube pt 5: Ube pot cookies
Wow another pot recipe, this was hit really good. I had squares that were each 50g, so I put around 15g in each cookie and it was a good high. The cookie itself was also really good and you can definitely taste the ube. This was for my boyfriend's sleepover since my other friend really enjoyed my last pot dessert. I made one regular batch and one weed patch. I wanted to bake another one for him before I moved to Texas. Well I already live in Texas, but I am moving to my new apartment with my boyfriend! It is a great location in Plano and we are near a lot of stores and food areas. I choose well! The apartment is super spacious and we re loving it so far. Back to the recipe, I cannot remember which recipe I used, because I am currently writing this entry on May 18, I baked this a month ago. I don't believe it was the same recipe form the unlikely baker that I did a while ago because the cookie consistency for this one is much thicker and not as chewy. Although these cookies were really good, I enjoyed the chewy cookies much more, they just have a better consistency and texture. So for this recipe, I followed all the normal steps but just inserted the chocolate into the cookie dough ball before I threw it in the oven. I really didn't think the cookies would hit that hard because I thought some of the weed in the chocolate would be burned off a little. I was so wrong. The recipe was pretty easy to follow, it was just a standard ube + cookie recipe consisting of mixing jam + extract then mixing the wet and dry batter together. I'll give this bake 4 cactuses because I wish they were more chewier and softer. The cookies were soft but not as much as I like it to be. The color turned out amazing though. It was the perfect purple I have been looking for. Not as dark as my other ube bakes. My friends really enjoyed them so this was a successful bake.
4/2/2026
5

First Bake of 2026: Ube Pot Brownies
I’d never had a cannabis brownie before, so making one was always on my bucket list. Since you can customize them however you want, I thought ube would be perfect. Originally, I wanted to make cannabutter so I could use it for future desserts, but the dispensary already had cannabis infused chocolate. I figured I’d just grab that save me some time. Cannabutter is basically weed infused butter made using flower. I forgot how much a full flower cost and I didn’t want to break my wallet. This brownie was for new years day so I thought it would be a perfect dessert! We played board games, ate a bunch of finger food and watched top gear. I never seen it before but all of my friends say that it is a late night show that pops up when the kids are suppose to be asleep. it is basically just old men driving cars, it is actually so funny. Back to the chocolate! The chocolate worked pretty well. I do wish they had white chocolate, but they only carried milk chocolate. It was super easy to use: I just followed a normal ube brownie recipe and substituted the chocolate used for the fudge with my cannabis chocolate. The whole bar was 500g, which is kind of insane lol. I only used 1/4 of it in the full batch, so about 125g. Typically, a decent serving is around 5–15g depending on your tolerance. To make the fudge portion, I had to melt the chocolate and this is where I might have messed up. When heating cannabis directly, you’re not supposed to use too much heat or you’ll burn the potency out. I used the broiler method to melt the chocolate, and I think it was too hot and i left it on for too long. When everyone ate the brownies, we had to eat a lot to really feel anything. We definitely felt something, but it wasn’t as strong as I expected. Considering the whole batch had 125g and four of us ate about 80g total, that’s roughly 20g per person. Either way, they were so good. I never realized how easy it is to substitute cannabis chocolate into desserts. You can basically use it in any recipe, which is why I originally wanted to make cannabutter. You can swap it in for regular butter. You could probably even make pot chicken if you really committed to it. This recipe gets 5 cactuses. The brownies themselves were thick, chunky, and chocolatey, but not the melty fudge texture I was hoping for. I definitely want to try another fudge style recipe where the chocolate really melts because that sounds amazing. Also, this recipe was not from The Unlikely Baker, which honestly surprised me since I usually love all of their recipes, especially for ube.
12/29/2025
5

Matcha Frog Sugar Cookies
Last dessert of the year! We had a skewer grill hangout at the park for an early Christmas since my boyfriend and I were heading to Seattle for christmas. I didn’t want to buy a ton of extra ingredients to make something crazy, so I decided on matcha cookies since I already had a big tub of matcha I bought a while ago. The cookies didn’t turn out green at all (because I didn’t use ceremonial matcha), and the shapes were turn out funny. After decorating, you could still tell they were frogs, but they weren’t as cute as Bianca’s from the recipe she posted. For the second batch, I tried making Shrek since he’s supposed to be green, but the ears expanded in the oven that they turned super round. I did not realize how much cookies spread. I should have learned my lesson from the red velvet sugar cookies I made a while back. The fun part was decorating. I had these glitter frosting tubes in Christmas colors, so I used those as an extra touch of sweetness. They ended up pretty goofy looking, but it adds charm. My friends loved them, and honestly, I was happy they weren’t over baked. Overall, I give this recipe 5 cactuses. It definitely would’ve been better with ceremonial matcha for that rich green color, and I should’ve made the cookies smaller or portioned the dough better for the ears. I had a lot of fun making these, and the recipe itself was a super simple mix-and-bake cookie.
12/15/2025
5

Garlic Bread Rolls
The more I work with dough recipes, the easier it feels. This time, I made garlic bread rolls as a Thanksgiving side. Unfortunately, this recipe ended up being a bit of a disaster not because the recipe was bad, but because I made a mistake due to my lack of experience with dough. The night before Thanksgiving, I made the dough so it could rise and be ready to bake the next day before my my family feast. This is where I messed up. I didn’t realize how long it would actually take for the dough to rise after being in the fridge overnight! Yeast is alive, and when it’s warm or at room temperature, it becomes active and starts to rise (like the undead)! I thought that taking the dough out of the fridge and letting it sit for 1–2 hours would be enough for it to reach room temperature, but I was so wrong. The dough was still cold and barely rose when I put it in the oven. When you don't give the dough enough time to rise, it won’t become fluffy. Instead, it turns mushy and isn’t stretchy, which affects the texture and taste. Even though the rolls looked pretty in the pictures, the filling and the bread itself only tasted okay. If I had set an alarm and taken the dough out about a few hours earlier, it would have had enough time to rise properly. I was really sad that day, but it was a good lesson for the future if I decide to make them again. Next time, I want to try making garlic knots because they look really pretty. In the pictures, you can see some rolls baked in muffin tins. Those were test pieces since the dough was taking a while to rise. Unfortunately, those came out super hard. It definitely sucked, but at least they were still edible and not as bad. I give this recipe five cactuses. It was easy to follow, and I liked that the parsley was mixed directly into the dough instead of just brushing garlic butter on top. That created a nice garlic and parsley flavor inside the bread.
11/23/2025
5

Way too Sweet: Strawberry Banana Tres Leches
My first dessert in Texas! This week, I was craving tres leches, so I decided to make a strawberry banana version. I’ve made a strawberry one before, but adding banana just sounded too good to pass up. This was my own recipe. Simple and reliable as always. Just a boxed cake mix, the three milks, and some heavy whipping cream. I guess using a cakebox mix is cheating, but it just saves so much time when I am lazy. So is this really considered baking? I am just mixing ingredients then "baking" it after. Anyways it’s super easy, inexpensive, and the ingredients cost about ten bucks total. Honestly, it’s one of the most budget-friendly desserts to make. This batch, though, turned out way too sweet. I don’t remember my other tres leches being this sugary, but the combination of condensed milk and cake mix was almost overwhelming. It actually made my stomach hurt a little. It definitely over-satisfied my sweet tooth, but the banana slices and unsweetened whipped cream helped balance it out a bit. I also added banana protein powder for a little extra protein and more banana flavor. I didn't notice it that much but there was a hint of it. Instead of whole milk I used fairlife instead. This was good because there was already so much sweetness and fat from the condensed milk. Since it’s tres leches, this dessert has never truly failed me. I’d give this recipe 4 out of 5 cactuses. I just wish I had used a different brand of condensed milk or maybe made my own cake mix to tone down the sweetness. There was also a lot more milk than cake this time, and I wish I’d used a bigger pan to help it soak better. Still, it was delicious, and now I’m already thinking about my next flavor idea: Oreo tres leches. That sounds so good.
10/11/2025
4

Ube pt 4: Ube Cheesecake Bars
This is the first dessert I’ve made in months! Ever since I moved to Texas, I stopped baking altogether. I think I just lost the love for it, or maybe it was because I wasn’t baking for the same people anymore. I’ve always loved baking, but I think what I loved most was baking for the people I care about. My boyfriend and I decided to ease back into it by making ube cheesecake bars. The recipe was pretty straightforward: just mix everything together and bake. Like most ube desserts, this one also used both ube jam and extract. Surprisingly, it wasn’t from The Unlikely Baker, which is rare for me because I’ve loved all of her recipes so far. My boyfriend actually found this one and wanted to give it a try. The consistency came out really nice, just like a proper cheesecake. I don’t think we used a water bath (though I can’t remember for sure), but even without one, it turned out great. The water bath is mostly for preventing cracks anyway, and ours looked just fine. The color was super pretty. It was a rich dark purple that made the bars look so pretty. As for the taste, the ube flavor wasn’t as strong as I expected. It mostly tasted like regular cheesecake with a slight hint of ube. I think we could’ve added more ube jam for a stronger flavor. The recipe called for splitting the cheesecake mixture in half. We used one part as the base and the other for the swirl design and that probably diluted the flavor a bit. If I make it again, I’d mix everything together for a more consistent ube taste. I’d give this recipe 4 out of 5 cactuses. It was super yummy and really easy to make. If I could change one thing, I’d add more ube jam for flavor and reduce the sour cream a little since its tang was a bit overpowering. Still, it felt so good to bake again, and it reminded me how much I’ve missed it.
10/1/2025
5

Flower Power: Red Velvet Cookies
I can’t believe it took me this long to make a red velvet dessert. Red velvet has always been my favorite flavor for any dessert, especially when it’s paired with cream cheese frosting. These cookies were super sweet. The recipe could use less sugar because it had my teeth tingling. To start off, I really wish I had used a bigger pan because the cookies expanded a lot and didn’t have enough room to spread or bake evenly. They ended up slightly undercooked in the center, but still tasted good. I just wanted normal, round cookies, but instead, I got a giant flower. They were thin, soft, and had a nice edge. At least I didn’t over bake them this time! Those days are behind me. Although, old me definitely would’ve left them in longer because they felt so soft when I first touched them, but I remembered they firm up as they cool. When I scooped the dough with my ice cream scoop, it looked so smooth and creamy, almost like actual ice cream. The texture was so pretty and honestly looked delicious even before baking. Next time, I’ll definitely use a bigger pan for normal sized cookies or maybe just make one big cookie because, why not? I could also try a smaller scooper or roll the dough balls by hand. Still, the ube cookies I made before remain my all-time favorite and best batch yet. I’d give this recipe 4 out of 5 cactuses, mostly because of how sweet it was. It was another TikTok recipe, and it was super easy to follow. I also loved that I didn’t need a mixer. Everything was done in one bowl, which made cleanup so much easier. I do wish I’d added more red dye, though. The cookies came out a light pink instead of that deep, rich red I was going for.
6/20/2025
5

Ugly and Okay: Ban Flan
My second Vietnamese dessert turned out to look so ugly. It honestly looked like mapo tofu and not the good kind. Some of the recipe’s instructions weren’t very clear, but we did a lot better on the second attempt. The recipe said to caramelize sugar in a saucepan and then gave an optional step to stir in espresso mix. I think I misread it, but honestly, the instructions could’ve been clearer. After caramelizing the sugar, I threw in the espresso mix which had water in it and that instantly caused the sugar to burn. It became a sticky, smoky mess that glued itself to everything. I had to start the batch over, which made me a little sad because I wasted ingredients and had to clean up the stickiest mess ever. The second batch went a bit smoother, but we ran into another issue. In the photos, you can see the caramel didn’t coat the entire bottom of the pan. That’s because it started solidifying super fast as soon as we poured it in. I think the problem was that we used a big pan instead of small ramekins. With a smaller surface area, the caramel would spread out and coat evenly. Shawn suggested that maybe we should’ve heated up the pan before pouring the hot caramel into a cold pan. Then came the color issue. Once the flan was done baking, it had this weird grayish tone instead of the pretty golden-yellow color it was supposed to have. Shawn thought it happened because the caramel and custard mixed together in the oven, instead of staying as separate layers. I thought the caramel was supposed to harden at the bottom while the custard set on top, but maybe the uneven coating caused them to blend. I’m still not totally sure. And finally, the texture it was completely off. I know flan should be smooth and a little bouncy, but ours turned out way too soft, almost like tofu. It broke apart so easily when I tried to scoop it. Shawn thought it was fine, but I didn’t love the texture. On top of that, the coffee flavor was way too strong. The recipe called for a full tablespoon of espresso, which I think was too much. It also didn’t help that the caramel layer probably melted into the custard while baking, spreading the coffee flavor throughout. Overall, I’d give this recipe 3 out of 5 cactuses. The flan still tasted okay, but the texture was off and the coffee flavor was overpowering. People in the comments seemed to have better luck with it, so maybe I just need more practice. It was a good learning experience though.
6/12/2025
3

I HATE Carrots: Carrot Cake
Carrot is probably one of my least favorite vegetables. I don’t like the smell or the crunch, and shredding them was honestly kind of gross, the smell just lingers on your hands forever. But I wanted to bake something yummy for my boyfriend, so I decided to challenge myself and make carrot cake! One thing that didn’t go as planned was the middle of the cake. It ended up being underbaked, which is why in one of the pictures it looks like someone punched the center of my cake. When I first took it out of the oven, it was super puffed up, but then it slowly deflated. I think it was either because I used too much batter for the pan so the heat didn’t spread evenly, leaving the middle gooey while the rest fully baked. As I’ve been baking more, I’ve noticed that most frostings are basically the same: cream cheese and a sweetener. For this one, I used cream cheese, sugar, and heavy cream, and it turned out delicious. I also didn’t know that carrot cake usually includes nuts! I added chopped pecans for a soft crunch and to make it look a little prettier. They paired really well with the texture of the cake. I’d give this recipe 5 out of 5 cactuses. It was easy to follow, and even with the underbaked middle, it still tasted really good. If I make it again, I’d probably bake it in two layers instead of one, or just use a bigger pan so it cooks more evenly. Overall, this was fun to bake and not bad at all for a vegetable I usually can’t stand. It was still so funny when my cake got deflated. Looks like someone punched it.
5/15/2025
5

A Fail: Matcha Blueberry Yogurt Clusters
For something that failed so badly, it actually turned out pretty good. The original plan was to make strawberry clusters, not blueberry ones! I had a strawberry U-pick scheduled at Manassero Farms at 11, but of course, it started raining. We ended up getting a refund, but it just felt so unlucky. I really think this dessert would have tasted better with strawberries, especially since I’m not a huge fan of raw blueberries. For the chocolate, I used an old bar I brought back from Belgium during my Europe cruise. I forgot to take a picture, it was really good but and also 2,400 calories. Not exactly ideal for a “low-cal dessert.” I was going to melt it in the microwave, but my boyfriend suggested using the boiling method instead. I didn’t even know it had a name! I’ve probably done it before, but it still felt like a first. The chocolate came out super thick and not as runny as I expected. I also didn’t have enough to fully coat all the clusters. On top of that, when I tried dipping the yogurt, the chocolate wouldn’t stick at all. I ended up having to smear it on. I think the moisture or condensation from the yogurt acted as a barrier, keeping the chocolate from bonding. My boyfriend pointed out that I should’ve coated the entire cluster so I could refrigerate them because the full coating helps the chocolate stay firm and hold in the yogurt. Since mine weren’t fully coated, I had to leave them in the freezer instead. Even so, they still tasted good, kind of like a chocolate yogurt popsicle I could lick or slowly shave pieces off. The good news is, it’s not supposed to rain again this week, so I can finally go strawberry picking! My boyfriend wants me to try making the clusters again, this time with strawberries and better melting chocolate. I think that’ll make all the difference. Something funny is that the recipe video I followed was from WolfieRaps, an old YouTuber I used to watch a lot! I didn’t even realize it was him until I read the comments. It was such a random and nostalgic surprise. Overall, I’d rate this recipe 3 out of 5 cactuses. The yogurt not coating properly was disappointing, but even though mine turned out pretty messy, it still tasted good thanks to the chocolate. It’s easy to make, macro-friendly, and makes a nice light snack that is something sweet but not too heavy.
4/25/2025
3

Puffed up: Cinnamon Rolls
This dough recipe that turned out really good! These actually tasted like real cinnamon rolls. Of course, Cinnabon still taste better, but mine were still super yummy and honestly, I kind of preferred that they weren’t as sweet. The flavor was definitely there. At first, my dough didn’t look smooth, and I started to worry that I messed something up. But after massaging it more and letting it sit for a bit, it softened up and smoothed out nicely. I learned that once you start kneading it, the dough just needs time to relax and come together. The recipe made about 16-18 rolls depending how thick you cut them. I ended up tossing the end pieces because they were uneven. I also think I cut the rolls a bit too thin, but they still puffed up beautifully and way more than I expected! After baking, they kind of looked like little nipples, but the swirl pattern still held perfectly. In the first picture, I made two different frostings. The one on the right was the standard version with cream cheese, milk, and sugar. The recipe called for butter, but I skipped it since there was already plenty of butter in the rolls themselves. The other frosting was my protein frosting, the same one I used for the Oreo brownies and Swiss rolls: made from yogurt, sugar, and cream cheese. It’s super good but has a slightly tangy flavor from the yogurt. I honestly didn’t think these would turn out this good! My friends really enjoyed them, and I did too. I’d give this recipe 5 out of 5 cactuses. The hardest part for me was definitely the dough. I’m still not completely confident making dough from scratch because it’s so easy to mess up if you miss a step. But rolling it up, cutting it, and seeing the rolls puff up in the oven was so satisfying.
4/18/2025
5

Brochi: Matcha Mochi Brownies
Mochi + brownie = Brochi (at least that’s what the recipe called it). I messed up quite a bit with this one, but they still turned out kind of good! I don’t think the mochi flavor is really my favorite, but it was still fun to bake and try something new. The first thing I messed up on was combining the dry and wet ingredients. Normally, you’re supposed to mix the wet and dry ingredients separately before combining them, but I was chatting with Shawn while baking and completely forgot. I learned afterward that the reason you do this is to help everything blend more evenly and prevent clumps. My next mistake was not sifting the matcha. There were a lot of visible clumps in the batter, and it looked kind of gross. You could even taste the clumps a bit in the final product. Sifting would’ve made the mixture smoother and more consistent. Another issue was that my batter turned out really watery. I’m not sure if it was supposed to be that way or if it was because I mixed the wet and dry ingredients too early, but I tried fixing it by adding extra flour. That probably wasn’t the best idea since it made the brochi taste a little powdery. Though honestly, it might’ve also been from the unsifted matcha. Even with all those mistakes, the brochi still turned out pretty yummy! They weren’t amazing, but definitely not a fail either. I’d give this recipe 4 out of 5 cactuses. I’m not a huge fan of mochi, but it was still really satisfying to see how they came out. The inside was so pretty, and it had a nice green to it. Next time, I’ll make sure to use a ceremonial matcha and sift everything properly.
4/9/2025
4

A Sucess: Protein Blueberry Muffins
This was my first time making muffins! I’ve been wanting to bake blueberry muffins for a while now, ever since I saw a recipe for them on Instagram. As a kid, I remember my uncle and cousins making blueberry muffins, and they’ve been my favorite flavor ever since. I finally decided to make them because I wanted something blueberry themed and also a protein bake for the week. They turned out pretty good overall. The only thing I wish was different is the shape. I wanted them to puff up more like traditional muffins, but they came out looking more like blueberry bites. They still tasted delicious, though. One thing I thought was really cool was the color of the blueberries once they were baked. Since some got mashed, the inside had this pretty purple color. The batter made around 24 muffins, give or take. One thing I learned: make sure you have enough paper muffin liners! They make such a difference when removing the muffins from the pan. I didn’t use any oil on one batch that didn’t have liners, and the bottoms stuck and crumbled apart. So definitely use liners or at least grease the pan next time. I’d give this recipe 5 out of 5 cactuses. The smell when they came out of the oven instantly brought me back to my childhood, that nostalgic feeling of eating fresh blueberry muffins while playing the Wii at my old house. My cousins and family were all there, and it was such a fun memory. I do wish my muffins looked like the ones on the recipe website, but mine still came out a beautiful golden brown and tasted amazing.
4/3/2025
5

Ube pt 3: Chewy Ube Cookies
I’m super happy with how these cookies turned out because this time, I didn’t overbake them! After baking for a while, I’ve finally learned that it’s okay for cookies to be a little undercooked when you take them out, they’ll continue to bake slightly as they cool. Another successful recipe from The Unlikely Baker! Like most of her recipes, the main ube flavor comes from a combination of ube jam and extract. At this point, I feel like you can turn almost any dessert into an ube dessert with those two ingredients. I’m not sure what ube dessert I’ll make next. Maybe ice cream? We’ll see in the future. I had been on a streak of making protein desserts lately, but this time, I wanted to bake something for my coworkers. It started as a joke, one coworker asked me to bake for him, and another immediately said, “If you’re baking for him, you have to bring me something too!” So, I decided to bake for everyone. All of my coworkers who tried the cookies really liked them, which made me so happy. I think the recipe made about 25 cookies total, and it was super easy to follow. As soon as I took them out of the oven, I pressed a few white chocolate chips on top. They stayed bright white and made the cookies look so pretty! This recipe is definitely a 5 out of 5 cactuses. It was easy, fun, and absolutely delicious. This is the kind of bake that makes you want to share it with everyone.
3/26/2025
5

This isn't a Swiss Roll? Red Velvet Cake
So this one was a total flop. It was basically the same recipe as the Oreo protein brownie I made earlier, just with red food coloring. I didn’t realize that red velvet is essentially chocolate with red coloring, no wonder it tasted so similar! The dessert itself wasn’t bad for the macros, but overall I thought it was just okay this time. The flavor wasn’t great because it was a bit dry, and honestly, you get tired of it quickly. I know that’s kind of how most protein desserts are, though. At the time, I was trying to cut calories but still wanted to bake something I could eat without guilt. Maybe I just haven’t found the right protein dessert yet, but so far, I haven’t really loved any of them. Another issue I ran into was with the pan size. I didn’t realize I was supposed to use a long baking pan so that I could roll the cake up. I used a square pan instead, which made the cake thicker and harder to roll. When I tried, it just wasn’t working, so I gave up and turned it into another brownie instead. I’ll give this recipe 3 out of 5 cactuses, mainly because it’s a protein dessert and the mistake was on my part. They always look amazing in the videos, but somehow ours always turn out a little different.
3/12/2025
3

Dry Protein: Oreo Protein Cake
Protein desserts can be a hit or miss, but this one was actually pretty good, especially for the macros. The whole batch came out to about 600 calories and 60 grams of protein, which is not bad at all. It was super easy to make and had a nice, rich chocolate flavor. One reason my brownie didn’t look as dark as the one in the recipe was because I didn’t have dark cocoa powder. I only had regular cocoa powder, so the color was lighter and didn’t really resemble an Oreo. The flavor leaned more toward plain chocolate rather than that deep, dark Oreo taste. Another thing I noticed was that I didn’t have much batter after combining everything, which is why my brownie turned out so thin. It was also a bit dry because, as usual, I overcooked it. Though, I also feel like the protein powder dried it out. I think the guy in the video used a smaller pan, so his recommended bake time was longer than what I needed. I ended up taking mine out a few minutes early because it was already done baking. For anyone trying this recipe, I’d recommend using a smaller pan or cutting down the bake time so it doesn’t turn out thin or dry. One part I absolutely loved was the frosting. It did have a slight tang from the Greek yogurt, but it was surprisingly delicious. For the frosting, I used Greek yogurt, cream cheese, and monk fruit sweetener. Monk fruit has zero calories, which makes it a great sugar substitute. The combination of these three ingredients created a gooey, sweet frosting that was so, so good. Overall, I’d give this recipe 3 out of 5 cactuses. The flavor was solid, and the frosting really stood out, but I wasn’t a fan of the bake time or the dryness. Even if I hadn’t over baked it, I think it still would’ve been a little too dry for my taste. I just wish the recipe had included better notes on pan size or adjusted baking times — but hey, it was still a fun and tasty experiment!
3/5/2025
3

My Two Favorite: Matcha Tres Leches
Back at it again with another matcha and tres leches dessert! Tres leches has honestly become one of my favorite desserts to make. It’s so easy, it always turns out good, and there are endless variations I still want to try. This one was extra special because it was for my friend Erick’s birthday. The first time I ever made tres leches, he told me he wanted one for his birthday, so here it is! I originally planned to make an Oreo version, but matcha and strawberry just sounded too good to pass up. Plus, I’ve been on a matcha baking streak lately. The matcha I used was from a big $25 tub I bought on Amazon. It’s not ceremonial grade, just regular matcha, but it still gets the job done. The color was definitely darker and the taste a bit milder, but I didn’t mind. I noticed in some recipes that they use ceremonial matcha, which explains why my cake turned out darker than the ones in the pictures. Ceremonial matcha can cost around $40 for a small tub — it’s worth it if you’re a big matcha drinker since café drinks can run $6–$10 each — but for baking, I’ll stick to the budget kind for now. I did over bake this one a bit (classic me). I poked the cake with a fork and saw some residue come off, so I left it in for another eight minutes — and it came out perfect! But then I made the mistake of leaving it in the oven to cool down, which caused it to keep baking and end up a little overcooked. Luckily, it’s tres leches, so the milk mixture saves everything from being dry. When it came time to decorate, I tried to do the powdered matcha design on top, but there was a big clump. When I tried scooping it off, it made the cake look worse, so I just mixed the matcha powder into the whipped cream and that actually helped. You can kind of see it in the third photo, before I added the strawberries. Once I started decorating with strawberries, though… it looked so ugly. I hated it. My boyfriend took one look and said I should’ve cut the strawberries into smaller chunks. He was totally right. It would’ve looked way better. At least it still tasted delicious! The recipe I used was for the matcha cake itself, and for the milk mixture I just combined the usual three milks with a little red food coloring for a soft tint. You can slightly see it in the picture where I added the matcha powder on top. Overall, I give this recipe 5 out of 5 cactuses. It was easy to make, simple to follow, and most importantly, Erick really liked it, which is all that matters since it was for him.
2/26/2025
5

Hard Cookies: Matcha Cookies
I recently bought a huge $25 tub of matcha because I hadn’t made any matcha desserts yet. At first, I wanted to try a matcha tiramisu, but since I’d never baked cookies before, I decided to make matcha cookies instead. While researching, I learned that there are different grades of matcha, the highest being ceremonial matcha, which has a lighter color and richer taste. The one I bought was just regular matcha, but I figured it would be perfect for baking. Like most of my desserts, I ended up over baking these because I was scared they weren’t fully cooked. When the oven timer first went off, the cookies looked too soft, the crust was barely formed, and they seemed fragile when I tapped them. So I baked them for about eight more minutes, which turned out to be a big mistake! They came out a bit too hard, though thankfully they softened up a little after popping them in the microwave. The center was still slightly fudgy and gooey, which made them taste better than they looked. I also tried the tortilla trick: placing a tortilla in the cookie container to help keep them soft. The idea is that the tortilla absorbs excess moisture and transfers it to the cookies, making them softer. Apparently, it works great for bread too, but I didn’t have any on hand. I think the trick worked somewhat, but since I kept the cookies in the fridge, they didn’t stay as soft as I hoped. Overall, I’d give this recipe 4 out of 5 cactuses. The recipe itself was good and easy to follow! I just over baked the cookies, which is definitely a lesson for next time. At least the microwave saved the day!
2/19/2025
3

Love Day: Strawberry Tres Leches
Tres leches is definitely one of the easiest desserts I’ve ever made — and it always turns out so good! It doesn’t really matter if you overcook the cake or add too much milk because it’s just so hard to mess up. This time, I didn’t follow a specific recipe since the process is simple: bake your cake batter and then make your milk mixture. Because this bake was for Valentine’s Day, I decided to go with a strawberry flavor! For the cake, I used a premade strawberry mix that smelled and tasted amazing. For the milk mix, I combined evaporated milk, regular milk, and sweetened condensed milk (any brand works). I also added a few drops of red food coloring to give the milk a soft pink color, as you can see in the picture below. Ingredients: - Cake mix (or make your own from scratch) - ¼ cup heavy cream - 1 can condensed milk - 1 can evaporated milk - ½ cup milk - Optional toppings (fruit, chocolate, etc.) Instructions: 1. Prepare your cake mix, or make your own from scratch. 2. Bake according to your recipe or box instructions. 3. Once baked, poke holes all over the cake with a fork. 4. Let it cool, then whisk together the evaporated milk, condensed milk, and regular milk. 5. Pour your milk mixture evenly over the cake. 6. While the milk absorbs, whip your heavy cream until fluffy. 7. Top with your whipped cream and enjoy! Now, the biggest part I messed up on was the whipped cream. My boyfriend had just moved out, and we didn’t have a stand mixer or even a hand mixer yet. Normally, you’d whip heavy cream until it thickens into that fluffy, airy texture, but since I couldn’t do that, I bought canned whipped cream instead. In the last photo, you can see how nice it looked at first… until it melted! I didn’t realize how fast whipped cream melts, even when kept in the fridge. So, lesson learned: always use heavy whipping cream for that pretty, stable consistency. After finishing the cakes, I topped them with fresh fruit. My friend Erick mentioned that my previous tres leches would taste great with fruit, so this time I added sliced strawberries and a few blueberries from the mix, and it turned out delicious. I give this recipe 4 out of 5 cactuses, only because of my whipped cream fail. But overall, everyone really enjoyed it! Tres leches has definitely become one of my staple desserts, and I can’t wait to make more in the future. Some flavors I really want to try next are Oreo, matcha, and red velvet.
2/10/2025
5

Puff Pastry Day: Cheese Danishes
Recipe to Puff Pastry: https://sugarspunrun.com/how-to-make-puff-pastry-recipe/ I was kind of hesitant to bake this because of the dough. I had never made my own dough before and was scared of failing — but you never know if you don’t try, right? I’m glad I did because it turned out really good! To be honest, when I was making the puff pastry dough, it looked a bit unusual at first, but I just kept smoothing it out and rolling it. Look how smooth the dough looks in the picture below — it turned out amazing! I was so happy with how it came together. One small issue, though, was my mini oven. The danishes in the back baked a little faster than the ones in the front, so some ended up more browned than others. Another thing I noticed was the difference between using aluminum foil and parchment paper. I used foil this time, and while the danishes didn’t stick too badly, the bottoms weren’t as flaky as I wanted. After looking it up, I learned that foil distributes heat rather than holds it, which can cause uneven baking — good to know for next time! That day was also Chinese New Year! I went to watch the lion dance and celebrate traditions at my aunt’s bakery before heading out. Later, we went to Shawn’s uncle’s house, where we took a few shots. His grandpa can really drink! We watched Joy Ride, which was super fun, then Moana 2, and afterward, I made the cheese danishes. It was such a cozy and festive day. By the way, I actually used two recipes, one for the dough and another for the cheese filling. I never realized how much cream cheese is used in desserts until I started baking regularly! The hardest part was definitely the dough since it was my first time making it from scratch. I always thought dough was difficult because it needs resting and careful handling, but it wasn’t too bad. The cream cheese filling was super easy to make and tasted delicious. I give this recipe 5 cactuses out of 5! It was easy, fun, and made me feel like a real puff pastry baker. I loved the golden color they came out with — slightly charred in the best way.
1/29/2025
5

Ube pt 2: Mini Ube Cheesecakes
Ube and cheesecake — possibly my favorite combination. I made this because I was craving more ube desserts, and after the mini blueberry cheesecakes I made last time, ube just sounded perfect. I found out that the Asian seafood market near me carries both ube jam and extract, so I don’t have to keep searching for them anymore. This recipe is another one from The Unlikely Baker. I made the cheesecakes the night before so they could chill properly in the fridge. I learned my lesson from my first batch of cheesecakes — they taste so much better cold. I was a little sad, though, because I only bought 18 mini cups, even though the recipe could’ve made around 20 to 25. I ended up with some leftover ube filling and wasn’t sure what to do with it. I probably should’ve just poured it into a pan and baked it anyway, but instead, I tossed it out. The mini graham cracker crusts are definitely my favorite part! I don’t have to make the crust myself, they’re super easy to serve, and they look so cute. I skipped the water bath because I was feeling lazy — I don’t really mind cracks on top. Most of the cheesecakes did have cracks, but they still tasted amazing. Everyone seemed to really enjoy them, which made me happy. Still, there are a few things I’d change next time. I would use less sour cream since the flavor was pretty strong — you could taste it in every bite, and it was a bit overpowering. I also wish the ube flavor came through more. Even after adding extra extract, it was still pretty mild. That day, Shawn smoked a brisket, and I thought something sweet would be the perfect way to end the meal. Everyone else brought sides, and we had a big feast together. I can’t remember what we watched that night, but I just remember it being a fun, cozy evening. Overall, this recipe was another success from The Unlikely Baker. I’d give it 5 cactuses out of 5. I do want to try making a full-sized cheesecake someday, but for now, I’m still enjoying my mini cup phase. The instructions were simple, clear, and easy to follow — it couldn’t have been easier!
1/10/2025
5

Wet Dessert? Tres Leches
Tres Leches — a wet sponge cake! The first time I heard about it was actually during a Discord call with my friends. Someone was describing it to me, but I didn’t realize what it really was until I made one myself. It truly is just a wet sponge cake! I thought it was strange at first because it sounded like a soggy dessert — and I usually don’t like soggy foods. But tres leches surprised me. It’s sweet, soft, and you can even adjust the amount of milk to make it less soggy if you prefer. This recipe was super easy to make and tasted amazing! It didn’t even matter if I overcooked the cake a little because the milk mixture soaked in and made it perfectly moist. The whipped cream on top complemented the sponge cake so well — everything about it just worked beautifully together. I remember the day I made it; we were having a Mexican dinner. My friend Erick brought over some beans he made, along with a little burnt red rice. Shawn made chicken thighs, and they turned out really good with the sides. To finish off the meal, I decided to make tres leches — and it was the perfect dessert to complete the dinner. I give this recipe 5 cactuses out of 5 because it was super easy to make and tasted so good. The texture was soft, creamy, and reminded me of a cozy, milky dessert. Everyone loved it, and I can’t wait to make it again someday!
1/3/2025
5

The Adventures of Agar Agar: Pandan Jelly
My first dessert recipe that actually required using a stovetop was Coconut Pandan Jelly. Did you know this recipe uses agar agar? I had never heard of it before until my friend mentioned it. I didn’t think I’d ever use it — until this recipe needed it. Aye Gar Gar. Pandan jelly consists of pandan and coconut. The process was easy but also a bit frustrating. I had to boil the coconut jelly and pandan mixture, then pour each layer while waiting for the previous one to solidify. The annoying part was that sometimes the layer took a while to set, so the jelly in the pot would start to solidify while I was waiting. Luckily, you can just reboil it to make it jelly again — though I ended up having to do that three extra times. It wasn’t my favorite thing, running in and out of Shawn’s backyard to keep reboiling the jelly. I did overboil the rest of the pandan, so some of it went to waste. It was okay though since the container didn’t have any more room for additional layers, so it wasn’t a total loss. The jelly actually came out looking really good. The layers stuck together nicely, and the shape held perfectly. I don’t usually like jelly, but I made this for my boyfriend since he was craving it. By the way, he made Bún Bò Huế that day — it was delicious. Even though I’m not a fan of jelly, I’d give this recipe 4 cactuses out of 5. It was easy to make but a bit annoying having to reboil the layers when they solidified too fast. Still, it was fun pouring the layers and watching it jiggle. I didn’t expect it to firm up that quickly, but now I know how layered jelly is made!
12/4/2024
4

Me and Ube: Ube Fudge Brownies
Ube has to be one of my favorite flavors. My first taste of ube was in a halo-halo from Café 86. Ube is a purple yam originally from the Philippines, and its flavor is similar to taro but a bit sweeter. Cooking with ube is always fun because the color is so rich, dark, and pretty. I think the hardest part of this recipe was finding the ube jam and extract. I managed to get the jam at Ranch 99 and, surprisingly, found the extract at Walmart. It can also be found at some Vietnamese grocery stores, though I can’t remember the name of the one I went to before. The H Mart near me didn’t carry any of these items, so if you plan to make this recipe, I’d recommend checking a Vietnamese market first. The jam added a nice depth of flavor, but the extract really brought out the color and enhanced the taste even more. Mixing everything together was my favorite part — the color turned out so beautifully! The texture of the batter was thick and gooey, and honestly, licking the spoon afterward is always one of the best parts of baking. Even though the batter looked amazing, the final result didn’t quite match up. After baking, the color darkened and didn’t look as pretty. I tend to overcook things — maybe because I’m always worried about undercooking and getting sick from raw ingredients? The top of the brownies turned a little hard and brown, and the white chocolate chips developed an odd yellow tint. One thing I learned is that it’s okay to take baked goods out a little early since they continue cooking as they cool. For next time, I’ll add some fresh white chocolate chips on top right after taking the brownies out of the oven. On the recipe website, the chips looked fresh and bright, and I’d love to recreate that look. Despite how they looked, the brownies tasted really good. I definitely prefer them cold — they taste fudgier and chunkier that way. When reheated, they became more crumbly and didn’t hold their shape as well. To conclude, finding the ingredients was the hardest part, but I’d still give this recipe 5 cactuses out of 5! The instructions were easy to follow, especially for a beginner. If there’s one thing I learned, it’s that pressing on white chocolate chips after baking gives your dessert a prettier finish. Mix and bake, then cook and take! The Unlikely Baker has so many other amazing ube recipes that I can’t wait to try out next.
12/4/2024
5

Strawberry? Protein Brownies
My first protein desert I have made! I accidentally overcooked them a bit, so the top came out ugly and brown. Surprisingly, it wasn’t that dry. It kind of just tasted like cake with a hint of strawberry. Everyone seemed to like it though, so I’d say the bake was a win. Instead of doing chocolate, I wanted to try strawberry because I had strawberry protein powder. I also used white chocolate chips instead, and they definitely added way more flavor than I expected. I was a little sad when I realized I overcooked the cake because the batter had such a nice pink color. It was still pink inside a little, but not quite the shade I wanted. I’ll definitely make sure not to over bake it next time. Even so, it smelled a lot like strawberry and tasted great! I remember this day clearly, my boyfriend was making bò kho, a Vietnamese beef stew dish. Everyone came over to eat, so I decided to try out these brownies. We also watched Smile 1, which was actually pretty interesting. Another easy recipe for the win! You just mix everything in a bowl and bake it. It’s hard to mess up, and I like how you can modify the recipe by changing the protein powder or type of chocolate.
11/4/2024
3

First Mini Desserts: Blueberry Cheesecake
Cheesecake has always been one of my favorite desserts because it’s super sweet and kind of cheesy in a comforting way. Originally, I was going to make mini pumpkin pies, but the mini crusts I bought were actually graham cracker crusts. Since cheesecake uses a graham cracker crust, I decided to make mini blueberry cheesecakes instead. These mini blueberry cheesecakes turned out really good, but they were even better after being refrigerated. There’s just something about a cold chunk of sweetness entering your mouth that brings me warm chills. I think I generally prefer cold desserts over warm ones. The only warm desserts I really enjoy are cookies — especially when they’re soft and chewy. But back to the cheesecake! The recipe was originally for a full-sized cheesecake, so I just followed the same instructions for the batter and filling. From that, I made a total of 18 mini cups with a little extra leftover. I think the recipe could easily make about 20 to 25 cups. Like most recipes, you just mix everything together and bake it. I did mess up a little, though, because I forgot to let the cream cheese and other ingredients come to room temperature. To fix that, I let the cream cheese sit in warm water, and it turned out fine in the end. This was definitely a lesson learned for next time. This dessert was actually for our 2024 Friendsgiving! I originally wanted to make pumpkin pie because, you know, that’s the classic Thanksgiving dessert. But it’s okay, no one really asked for it anyway. I give this recipe 5 cactuses out of 5. I do wonder if it would’ve tasted even better if I had mashed up the blueberries and made a jam topping instead. That’s probably just personal preference since I don’t really like whole blueberries. Either way, it was a total success that night! Also props to my friend Erick. He's been taking photos of my deserts in the beginning. I didn't bother to because I didn't think about making this website at the time.
10/23/2024
5

My First Desert: Magnolia Banana Pudding
This Banana Pudding consisted of whipped cream, bananas, Nilla crackers, and sweet stuff. The recipe was super easy to make, and it was a no-bake recipe. All I had to do was prep the pudding the night before, whip the heavy cream, then create the layers. I got these mini containers from Daiso and made mini banana pudding jars. I remember that on this day, my eardrum actually burst due to too much pressure building up in my right ear from my back-to-back flight from Europe. It really hurt, but the banana pudding somewhat saved the day. I gave out a mini jar to my friends: Eman, Erick, and Shawn (my bf), they all seemed to like it! What caused me to make this was my brother Patrick. The other night he brought a tub home, and it was really good, so I asked for the recipe to make it myself. The recipe was simple but I was scared at first because I never used a hand mixer before. I HAD to use it in order to whip the cream, and it wasn't so bad. I tried whipping it with a whisk but you have to whip consistently and fast, so I used the mixer instead. This was my first time making a dessert on my own. I believe the first dessert I ever made was cake pops with my aunt and cousins super long ago. My second was making a regular cheesecake with my friends. It's been about 6 years since I baked or made anything. This day is the beginning of my baking journey. It wouldn't have started without the jar that my brother brought home. I forgot to take a picture since I don't usually so here is the stock photo from the recipe website.
10/11/2024
5